In this blog, we discuss step by step guide to perform Microsoft Teams eDiscovery.
License and Permission
To perform this you must have a proper license (Microsoft 365 E3 or Office 365 E3 subscription or higher) and you must be eDiscovery manager or Admin.
You may also like - Microsoft Teams Security Policy Best Practices
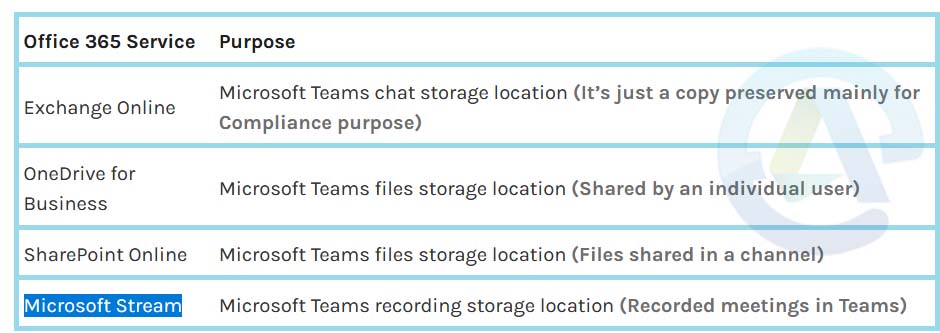
Microsoft Teams’ Storage Locations
Its really important know about the storage locations of Teams before proceeding and they are: Exchange Online, OneDrive for Business, SharePoint Online and Microsoft Stream.
How Perform Microsoft Teams eDiscovery
- Create a Case in Office 365 Core eDiscovery
- Create an Office 365 eDiscovery hold
- Search Teams content in a Core eDiscovery case
- Export the search results
You may also like - How to Fix Microsoft Teams Chat History Missing or Disappear
Follow the detailed steps to do Microsoft Teams eDiscovery
#1. Create a Case in Office 365 Core eDiscovery
Go to the Security & Compliance center.
Then select eDiscovery–> eDiscovery from the lest pane.
Under the eDiscovery page, you need to select Create a Case.
After that you will see a web-page where you need to enter the case name and description.
Then click on Save. Now, the new case will appear in the eDiscovery page.

Also you can add members to the case, its an optional.
#2. Create an Office 365 eDiscovery hold
You have an option to create multiple holds in case. To do this follow the below steps:
Under the Core eDiscovery page, select the case and click on “open” to create a hold.
You will see a new web page, click on “Holds” see at the top.
Then in the hold page, you need to click on “Create” button to create a new hold.
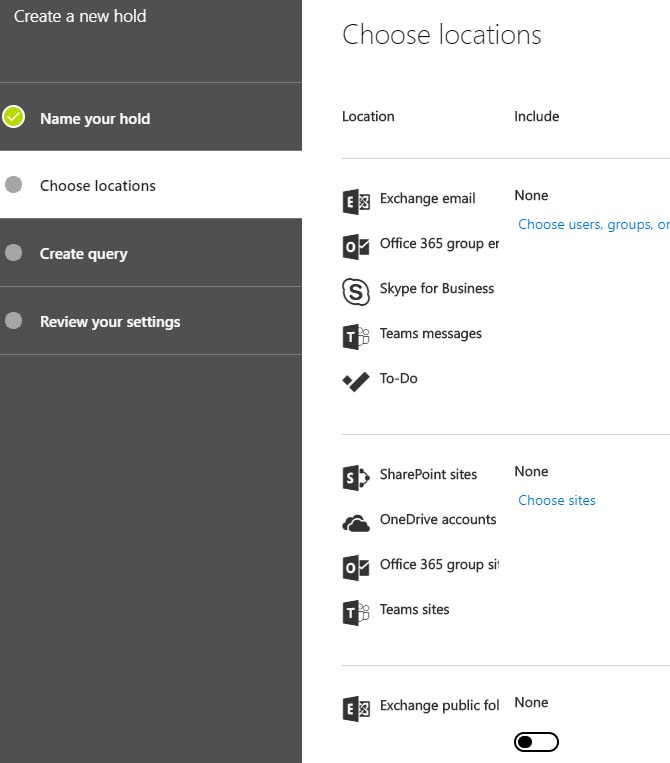
Again a page will appear where you need to enter the name and description of the hold. Then click ‘Next’ button.
Now you have to choose locations to place a hold. You can choose mailbox, sites and public folders.
- For Mailboxes, you need to select “Choose users, groups or teams”. Then a ‘Edit locations’ page will appear where you have to click on “Choose users, groups or teams” button. Now, search the required location and click “Choose” button. Then click “Done”.
- For sites, you need to select ‘Choose sites’. Under the ‘Edit locations’ page click on “Choose sites” button. Now, search the site name or paste the URL on the site and click on “Choose”. Then click “Done”.
- For Exchange public folders, you need to enable the toggle switch which is available there. And then click on “Next”.
You can add multiple condition by clicking “Add condition” button.
Lastly, you can review your created hold and then click on “Create this hold” button.
Now your hold statistics will appear.
#3. How to Search Teams content in a Core eDiscovery case
Once you hold is created, you need to select the ‘Searches’ tab in the top.
Then click on “New Search” button to create a new teams content search.
Using query conditions, you can search the Teams content. For this click on “Add conditions” button to add query conditions.
Now, you have to select the locations for searching the Teams content. Get location references on hold, and select based on your requirements.
Then click on “Save & run”. You will see a web-page to enter name and description (optional) for the search. Then click on “Save”.
Finally, the results will appear along with the preview.
#4. Export the content from Core eDiscovery case
Finally, you have a search result preview and an option to export the eDiscovery search results by using the eDiscovery PST export tool. To do this follow the below steps.
Under the search results page, click on the “more–>Export results”.
Now you have to select the output option and the export estimation will be shown to proceed further.
Once you have selected the required options, click on the “Export” button.

Now go to “Export” tab. Your export result will be available their. Select the results which you want to export.
You will see a web-page with the total items of the results and the export key.
Note – Supported browser Microsoft edge or Internet Explorer.
At last, copy and paste the export key to download the results.
Discoverable and Non-discoverable Teams Contents in eDiscovery tool
| Discoverable Items | Non-discoverable Items |
| Teams chat messages | Audio recordings |
| Private channel messages | Code snippets |
| Emojis, GIFs, and stickers | Name of the channel |
| Chat links and Edited messages | Reactions |
| Inline images and Subject | |
| Quotes |
Limitations in Office 365 Core eDiscovery
No limit for Maximum number of cases for an organization.
Max 10,000 – case holds for an organization.
Max 1000 – mailboxes in a single case hold.
Max 100 – sites in a single case hold.
Max 1000 – cases will be displayed on the core eDiscovery page.
These are the limitations you must aware of that before or after performing eDiscovery.
Conclusion
I hope this blog will help you to learn how to perform Microsoft Teams eDiscovery and find the Teams content using the eDiscovery tool. Let me know if you have any issue in comments.
2 thoughts on “Step by Step Guide to Perform Microsoft Teams eDiscovery”