Looking for ways to change the Location for Outlook Data File (PST & OST).
Then this article is for you, here we will discuss how to change the location of Outlook data file i.e OST and PST Manually. You need to be very care-full while changing the location of Outlook data files (OST and PST). You may lost your data if any flaws occurs. So its always recommended to take a backup of your Outlook data files – OST and PST.
You can achieve this manually or using tools – Top 3 OST to PST Converter Software
How to Change the location of the OST Outlook data file
Here will let you know how to change the location of OST without any interruption.
Location of Outlook Data File (OST)
- drive:\Users\\AppData\Local\Microsoft\Outlook
- drive:\Documents and Settings\\Local Settings\Application Data\Microsoft\Outlook.
Solution1: Set ForcePSTPath Registry Entry
Go to Run then type Regedit and press ok.

Now you will see the Registry editor, here you need to check the key for version you are using. Like;
For Outlook 2016, the key is:
HKEY_CURRENT_USER\Software\Microsoft\Office\16.0\Outlook
For Outlook 2013, the key is:
HKEY_CURRENT_USER\Software\Microsoft\Office\15.0\Outlook
For Outlook 2010, the key is:
HKEY_CURRENT_USER\Software\Microsoft\Office\14.0\Outlook
For Outlook 2007, the key is:
HKEY_CURRENT_USER\Software\Microsoft\Office\12.0\Outlook
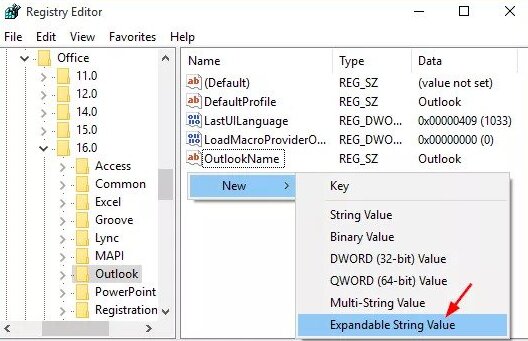
Navigate to Outlook 2016/2013 as per your version and right-click on an empty area. Then you will get an option saying “Expandable Strings” select it.

Now you have to rename the “Expandable Strings” as “ForceOSTPath”, and then double click on it.
On the “Edit String” dialog box, enter your desired path where you want to save under the “Value data” box and then click OK.
This will change the location of the Outlook 2016 data file (.OST) to the new location which ever you specified.
Solution 2: Use Outlook Email Client
Outlook data file location can be changed using outlook account.
Before proceeding you must need to know the the default location of the OST file. Like; In Windows 10/8/7 the default location of the OST file is: C:\Users\%username%\AppData\Local\Microsoft\Outlook
Follow the below steps to change the location of OST file.
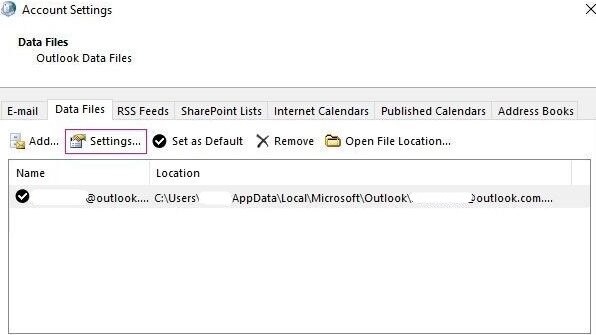
Go to -> Account Settings select the Data Files tab.
Now select the Exchange Server account and click on Settings.

After selecting the Settings tab in the Data Files tab.
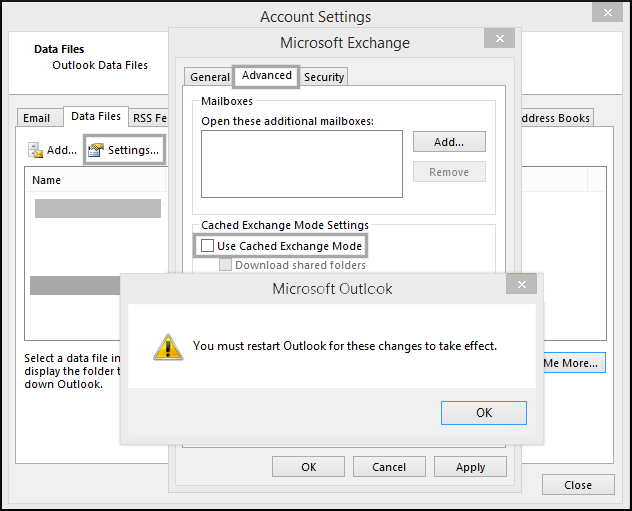
Under Microsoft Exchange account, you need to go to the Advanced section, and then UN-check the Use Cached Exchange Mode checkbox and then click ‘OK’.
Make sure under the Advanced tab, choose Outlook Data File Settings > Disable Offline Use > Yes.
Now you have to choose Outlook Data File Settings and then select ‘I want to move the old file’ option which is available.
After that, select the Browse tab, then the Offline Outlook Data (OST) file that was moved to a new folder at any location, and then click Open. Outlook will create a new OST file.
Under the Advanced tab of Microsoft Exchange account, you need to check-mark on the Use Cached Exchange Mode checkbox and click OK.
After that it prompts to restart Outlook email client, click on the OK tab.

Remember – Once a new OST file is created, the old OST file is not deleted automatically. You need to delete the file manually.
How to Change the location of the PST Outlook data file
Locating the .pst file
Follow the below steps to access your Personal storage table with ease.
Outlook 2007
File-> Data File Management.
Outlook 2010 / 2013 / 2016 / 2019 / Office 365
File-> Info-> Account Settings-> Accounts Settings.
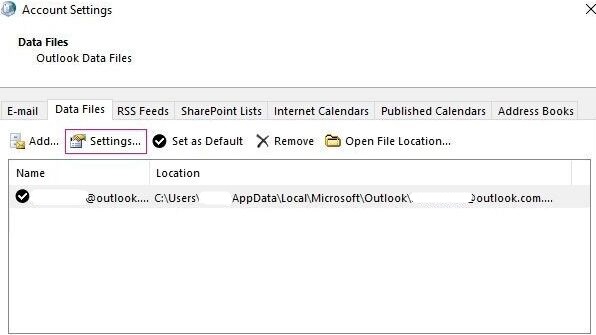
After following the above mentioned steps, you will be able to see a tab. Click on the “Data files” tab to access your Outlook data files.

Open your Outlook data file and click on the option saying “Open file Location”
After this, you can change the location of your Outlook data file (.pst) to your desired location
By following above steps you can easily and efficiently change the Location for Outlook Data File (PST & OST).