This blog will guide you how you can export Exchange 2010, 2013 and 2016 mailbox to PST using PowerShell cmdlet New-MailboxExportRequest.
Mainly users export exchange mailbox i.e. EDB files to PST files for archiving because PST is the best way to store the email locally as a Backup. Also, for security compliance and when moving mailbox to another location (between exchange database).
Export Exchange mailboxes to PST file
To export or import you need to assign rights because by default, no exchange user can export or import Mailboxes to or from PST files. As part of the Role Based Access Control (RBAC) in Exchange 2016 there’s the Mailbox Import Export role, but this role isn’t assigned to any account/user or Security Group. This can be easily done by adding Mailbox Import Export role to the user or simply you can add the user/account to a security group with this right.
By using Exchange Management Shell cmdlets, Exchange users can convert EDB files to PST format easily, only needs permissions to do so. However, In Exchange Server 2013, apart from the cmdlets, Exchange Admin Center (EAC) can be used to perform the export action.
Use Exchange Management Shell to export Exchange mailbox to PST
In Exchange server, the below steps are required to export mailbox to PST.
- First, Add Mailbox Import Export Role to the User
- Second, Prepare the PST destination folder
- Third, Export the mailbox to PST
Add Mailbox Import Export Role to a user
- To Import PST file: Read Permission.
- To Save Exported PST file: Read/Write Permission
To add Mailbox Import Export Role to a user, use the below cmdlets:
New-ManagementRoleAssignment -Role "Mailbox Import Export" -User “<user name>”
To add the role to a mailbox named ‘ExpertABC’ the cmdlets are:
New-ManagementRoleAssignment -Role "Mailbox Import Export" -User “ExpertABC”
Another option is you can create a security group, then add the user to this group, and add Mailbox Import Export Role to this security group. To add the Mailbox Import Export role to the security group use below cmdlet:
New-ManagementRoleAssignment -Role "Mailbox Import Export" -SecurityGroup “<security group name>”
To add the role to a security group named ‘ExpertSecurityGroup’ use:
New-ManagementRoleAssignment -Role "Mailbox Import Export" –SecurityGroup “ExpertSecurityGroup”
In Exchange 2013 you can perform all these actions using EAC.
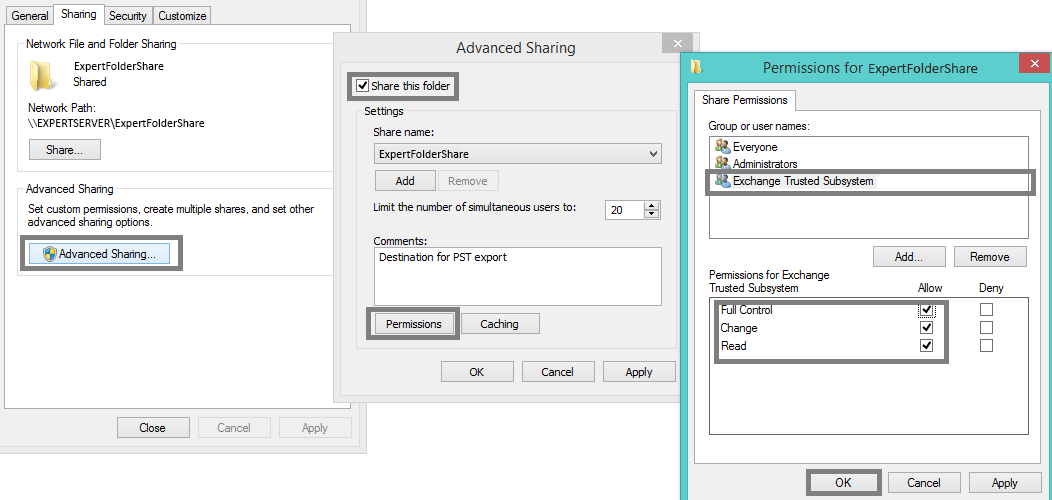
Prepare PST destination folder
The destination PST folder should be shared folder accessible to the user. So create a network share and provide all permissions to Exchange Trusted Subsystem.

Export mailbox to PST
Finally you can move the mailbox to the PST file using below cmdlet:
New-MailboxExportRequest -Mailbox <MailboxName> -FilePath “<Path to the PST file>”
To move a mailbox named ‘ExpertABC’ to a folder named ‘ExpertFolderShare’ on the server EXPERTSERVER.
New-MailboxExportRequest -Mailbox ExpertABC -FilePath "\\ EXPERTSERVER\ExpertFolderShare\Destination.pst"
If the mailbox is an archive, you can use below cmdlet:
New-MailboxExportRequest -Mailbox ExpertABC -FilePath “\\EXPERTSERVER\ExpertFolderShare\Destination.pst” -IsArchive
The above steps help you to Export Exchange Mailbox to PST with Powershell. Simply open the Exchange Management Shell and run a few cmdlets given here or you can check the third party tools to export mailbox to pst.