In this blog, we will discuss how to migrate from Exchange Server 2007 to Exchange Server 2016. As we know, upgrading from Exchange Server 2007 to Exchange Server 2016 is considered a tedious task as it cannot be done directly. Refer to the TechNet article for more information.
Can’t install Exchange server 2016 in a forest that contains Exchange server 2007 servers: https://technet.microsoft.com/en-us/library/ms.exch.setupreadiness.e16e12coexistenceminversionrequirement(v=exchg.160).aspx
So, Exchange Server 2007 to Exchange Server 2016 migration is a double hop migration —first you need to upgrade from Exchange Server 2007 to Exchange Server 2010/2013 and then from Exchange Server 2010/2013 to Exchange Server 2016.
Method 1 – Upgrade from Exchange 2007 to Exchange 2016 using Exchange Server 2010
Method 2 – Upgrade from Exchange 2007 to Exchange 2016 using Exchange Server 2013
Method 1 – Upgrade from Exchange 2007 to Exchange 2016 using Exchange Server 2010
Upgrading from Exchange 2007 to Exchange 2016 through 2010 involves two major stages:
- Upgrade from Exchange 2007 to Exchange 2010
- Upgrade from Exchange 2010 to Exchange 2016
I. Upgrade from Exchange 2007 to Exchange 2010
Follow the steps below for the Exchange 2007 to Exchange 2010 upgrade:
Ensure that you have the system requirements
For smooth installation of Exchange 2010 and upgradation from 2007, ensure that you have the minimum system requirements:
For Exchange 2010
- Processor– 64-bit supported (computer with x64-bit architecture)
- Disk space – 1.2 GB (for installation) + 200 MB free space
- OS – Windows Server 2008 (SP2)/2008 R2 – Standard/Enterprise editions (64bit)
- For management tools – Windows 7/Vista (64bit)
- Additional – NTFS (for disk partitions), .NET Framework 3.5 SP1, IIS,
- Windows PowerShell V2.0, Windows Remote Management V2.0
In Exchange 2007
- Exchange 2007 Service Pack 3 (for each server)
- Configure disjoint namespace
If you want to run a disjoint namespace in Exchange 2010, do the following:
- Configure the DNS suffix search list using GPMC
In this step, set a DNS suffix search list using a GPO.
- Create a list of allowed DNS suffixes.
For this, modify the relevant attribute (msDS-AllowedDNSSuffixes) value of the domain object container (using ADSI edit).
Also, verify these settings (by pinging from other servers).
- Install the Client Access Role
Client Access Role is the first server role to be installed on a server. This role facilitates the functioning of Exchange email clients.
You can install this role from the Exchange 2010 DVD by running the setup exe (if not installed previously, install .NET Framework 3.5 SP1 and Windows PowerShell v2 from here). For Exchange 2010 installation, accept the license agreement, and follow the instructions in the dialogue box. Here is what you will do while going through different pages of the installation wizard:
- Enable the error reporting feature if required
- Opt for ‘Custom Exchange Server installation’
- Change the Exchange installation path if necessary
- Select Client Access Role on the Server Role Selection page
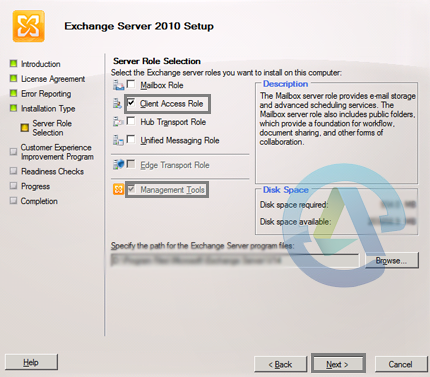
Figure 1. Installation of Client Access Role
- Configure an external FQDN (for connection with email clients)
- Fix errors, if any are reported by the wizard
Finally, install Exchange and verity it using the Get-ExchangeServer cmdlets (in Exchange Management Shell). After the installation, add digital certificates and configure Outlook Anywhere and virtual directories.
NOTE: It is possible to have separate servers for each role; but you can deploy multiple roles on servers as per the requirement.
- Install the Hub Transport Role
Hub Transport Role facilitates internal mail flow in the organisation. It can be installed on a separate server or on the same server on which the CAS role was installed.
To install the Hub Transport Role (on a separate server), follow the same steps as those for the installation of the CAS role. But on the Server Role Selection page, select Hub Transport Role. And verify the installation using Get-ExchangeServer cmdlets (in Exchange Management Shell).
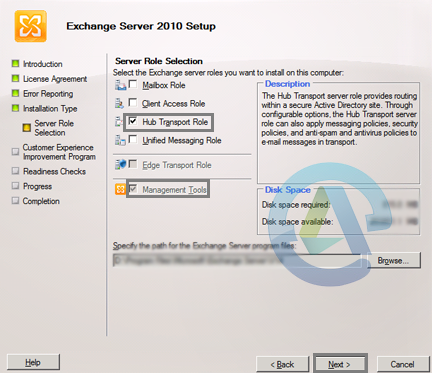
Figure 2. Installation of the Hub Transport Role
To ensure co-existence between the Exchange 2007 and Exchange 2010 environments, configure a legacy DNS and associate it with the Exchange 2007 Server (while the current one will be associated with Exchange 2010 CAS). The steps are not given here as they may vary according to the firewall configuration and the internet provider.
- Install the Unified Messaging Role
The Unified Message Role facilitates voice mail and fax in Exchange mailboxes. For installation and verification of this role on a dedicated server, follow the steps for the earlier roles, but select Unified Messaging Role on the Server Role Selection page.
The next step after the installation of UM role is to configure and enable unified messaging. If you already have UM in Exchange 2007, transition it to Exchange 2010 using Exchange Management Console or Exchange Management Shell. If you do not have one in Exchange 2007, create and configure a dial plan, gateways, and mailbox policies for UM, and then add the UM server to a dial plan. Finally, enable users for UM so that they can start using the UM features.
- Install the Mailbox Role
Mailbox Role is important as it hosts databases—both the mailbox database and the public folder database. Its installation and verification procedure—except for the selection of Mailbox Role on the Server Role Selection page— are the same as those described earlier.
As the next step, you can move the offline address book generation to Exchange 2010. Use the Move Offline Address Book wizard (of Exchange Management Console) to do this.
NOTE: How to install a server role along with an already installed one?
After the installation of the Client Access Role, it is possible to install Hub Transport, Unified Messaging, and Mailbox Roles on the same server. However, the procedure for this is slightly different from that for installing them on a separate server. Here is how you can do this:
- Select Microsoft Exchange Server 2010 from the list in Control Panel > Programs and Features, and select Change.
- Click Next in the setup wizard.
- Select the required role on the Server Role Selection
- Proceed as with the installation procedure and complete the process.
- Restart the computer.
- Install the Edge Transport Role
The Edge Transport Role is different from all other server roles—it cannot exist with any other server role as the other roles do. Its responsibility is antivirus and anti-spam filtering, it is deployed outside the AD forest (in the perimeter network) for security reasons. On the installation and verification side, the procedure is similar, but it is mandatory to deploy this role on a dedicated server.
At this stage, you can subscribe to the Edge Transport server—either subscribe to the new Exchange 2010 Edge server or transition the Edge subscription from Exchange 2007 to Exchange 2010. These actions can be done using the Exchange Management Shell (on Exchange 2010 Edge Transport server). And the subscription can be verified using Get-EdgeSubscription cmdlets.
- Migrate mailboxes/public folders to exchange 2010.
Finally, move mailboxes and public folder data from Exchange 2007 to Exchange 2010.
To migrate mailboxes from Exchange 2007 to Exchange 2010 by create local move requests in Exchange Management Console (Recipient Configuration > Mailbox). While creating a move request, you can select mailboxes for migration and can browse for the database to which they are to be migrated. After successful completion of the move, use Get-Mailbox cmdlets to the mailboxes on the Exchange 2010 database to get the list of mailboxes over there.
To migrate public folders from Exchange 2007 to Exchange 2010 by replicate them using the Exchange Management Console (Toolbox > Public Folder Management Console). The public folder migration can be verified by using Get-PublicFolder cmdlets in the Exchange Management Shell.
- Perform the final tasks
Again use the Get-ExchangeServer cmdlets to verify the Exchange installation. You can license the product now. And finally, proceed to configure accepted domains, internal mail flow, Outlook Anywhere, internal SMTP server list, and safe list aggregation.
II. Exchange 2010 to Exchange 2016 migration
As the second part of Exchange 2007 to Exchange 2016 migration, you need to upgrade from Exchange 2010 to Exchange 2016.
- Install Exchange 2016 in your Exchange 2010 organisation.
- Configure Exchange 2016 and Exchange 2010 coexistence.
- Migrate Exchange 2010 mailboxes, public folders, and other components to Exchange 2016.
- Decommission and remove all Exchange 2010 servers.
Remove the Last Legacy Exchange Server from an Exchange 2010 Organisation: https://technet.microsoft.com/en-us/library/gg576862(v=exchg.141).aspx
Mailbox Migration from Exchange 2010 to Exchange 2016
You can use the Exchange Deployment Assistant to help you complete your deployment.
Exchange Server Deployment Assistant: https://technet.microsoft.com/en-us/office/dn756393.aspx
Method 2 – Upgrade from Exchange 2007 to Exchange 2016 using Exchange server 2013
Upgrading from Exchange 2007 to Exchange 2016 through 2013 involves two major stages:
I. Upgrade from Exchange server 2007 to Exchange server 2013
Here is a step-by-step guide to Migrate from Exchange server 2007 to Exchange server 2013.
II. Upgrade from Exchange 2013 to Exchange 2016 migration
Here is a quick migration guide to Migrate from Exchange server 2013 to Exchange server 2016.
By following the above steps, you can easily migrate from Exchange Server 2007 to Exchange Server 2016.
Third-Party Exchange Migration Tools
Seamlessly migrates mailboxes across Exchange Servers and Microsoft 365, supports same and cross-domain without the need to run complex PowerShell scripts.