Office 365 SharePoint Online — Microsoft’s Cloud solution provides businesses a way to avoid infrastructure costs related to communication. With it, organizations can have their own Exchange, SharePoint, and Lync online managed by Microsoft. SharePoint 2010 is used by various organizations and many of these organizations are looking forward to upgrade/migrate to the more powerful and enormously successful SharePoint Online.
Planning for SharePoint migration is the most critical part of a SharePoint migration. A successful migration from SharePoint 2010 to SharePoint Online Office 365 necessitates complete planning and analysis.
Here are some pre-requisites that you must take care of while migrating data from
SharePoint 2010 to SharePoint Online via Azure Storage
.
- Create an Azure Storage resource.
- Install SharePoint Online Management Shell version 16.0.4017.1200 or above.
- Install SharePoint PowerShell 4.0 prior to the Online Management Shell.
SharePoint 2010 to SharePoint Online Migration Steps:
Step 1: Export the data from the SharePoint 2010 environment using Export-SPWeb.
- Go to the start menu, and run the SharePoint 2010 Management Shell as Administrator.
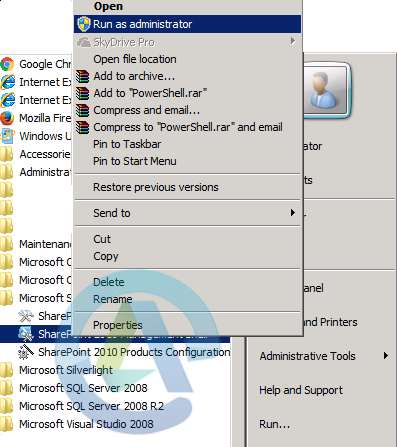
- Now, run the following command:
Export-SPWeb -Identity “http://<On-PremSPSite>” -ItemUrl “/OnPremDocLib” -Path “C:\SPOnPremExport” -NoFileCompression -IncludeVersions 4Note: Replace the Web URL and the Document Library with your own URL and Library name.
- After completing it successfully, you will see that a folder has been created with the contents shown below:
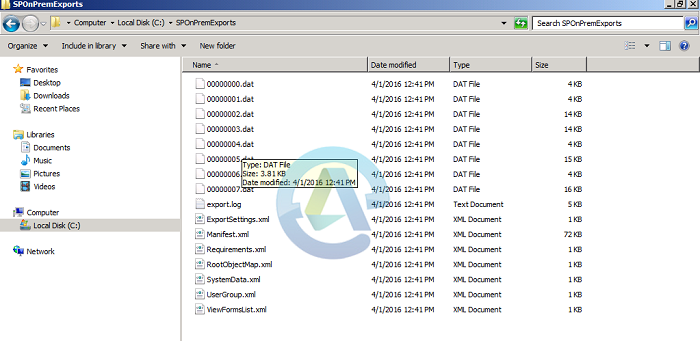
You can create the missing file LookupListMap.XML manually. - Create a new XML file in the above exported folder with the name: LookupListMap.xml and add the following lines to the file:
<?xml version=”1.0″ encoding=”utf-8″?>
< LookupLists xmlns=”urn:deployment-lookuplistmap-schema”/>
Step 2: Convert the Exported package to the SPO Migration Package using the SharePoint Online Management Shell.
- Copy contents of the export folder to a new path: “C:\migrationpackages\SPOTemp”.
- Then, run SharePoint Online Management Shell as Administrator.
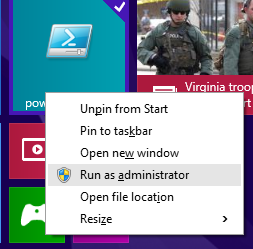
- Within the ISE, write the following command: Connect-SPOService -URL https://<TENANT>-admin . sharepoint . com
- After executing this command successfully, enter the Tenant Admin username and Password.
- Now, run the following command:
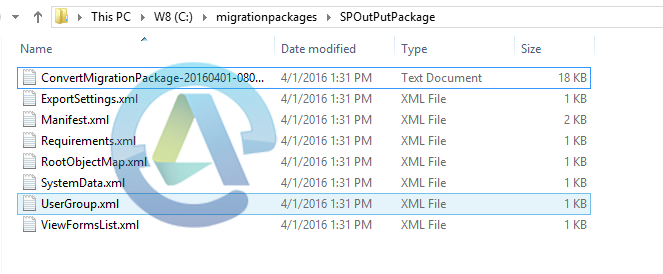
ConvertTo-SPOMigrationTargetedPackage -SourceFilesPath “C:\SPOnPremExports” -SourcePackagePath “C:\SPOnPremExports” -TargetDocumentLibraryPath “Shared Documents” -TargetWebUrl https://<YourTenant>.sharepoint.com -OutputPackagePath c:\migrationpackages\SPOutPutPackage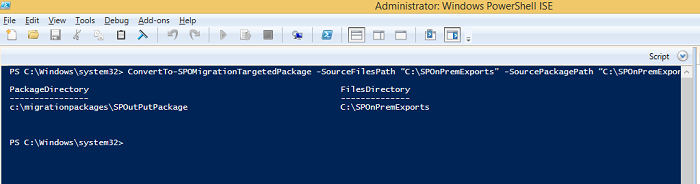
- This will create the SPOutPutPackage folder with the contents as shown below:
Step 3: Upload the SPO Migration Package to your Azure Storage account.
- Write the following command:
$azurelocations = Set-SPOMigrationPackageAzureSource -SourceFilesPath “C:\MigrationPackages\SPOTEMP” -SourcePackagePath “C:\MigrationPackages\SPOutPutPackage” -FileContainerName migration-files -PackageContainerName migration-package -AccountName “yourstoragestorage” -AccountKey “AZURE STORAGE KEY”
- From the Azure portal, obtain your Azure Storage Key and Storage Name.
- Enter your Office 365 environment credentials.
Step 4: Submit the Migration Job.
Submit the job by entering the following command:
Submit-SPOMigrationJob -TargetWebUrl https://yourtenant.sharepoint.com/ -MigrationPackageAzureLocations $azurelocations
Then refresh your document library within office 365, and you will see that content has been migrated.
Finally, successful migration is done from SharePoint 2010 to SharePoint Online.